Toilet T Installation
REMOVE THE T-VALVE FROM THE VELVET BAG,
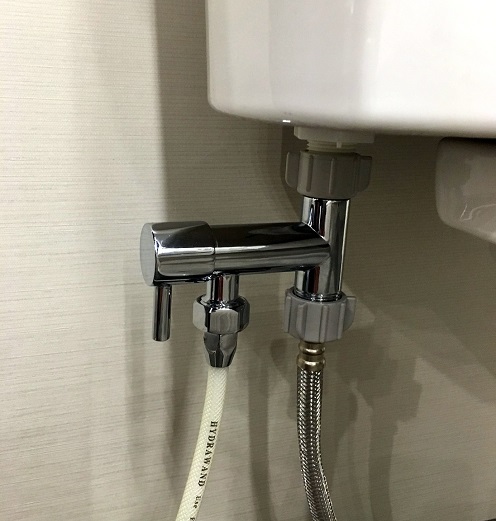
MAKE SURE THE WASHER IS IN THE SWIVEL NUT
- Turn off the water valve to the toilet tank, and flush the toilet to remove water from tank.
- Unscrew the water supply line nut where it connects to the tank. (Lay a towel underneath for drips when you lay the hose end down.)
- Attach the HOSE to the T-Valve and tighten.
- Make sure the rubber washer is in the TEE SWIVEL-NUT & place the Complete Assembly under the toilet tank, (as in the picture) and screw the Tee Swivel Nut onto the tank inlet. Test to see which direction is most convenient for you, for the valve handle to face.
- GENTLY TIGHTEN TEE SWIVEL NUT. Do not over tighten as you could damage the tank outlet, as most are made of plastic.
- Screw the water supply line to the bottom of the Tee, holding the Tee for back up &tighten. Slowly open the water valve, and check for leaks.
- Open the Hydrawand T-Valve by turning the handle 1/4 turn counter-clockwise. The handle is closed when it is pointing across the direction of water flow. The reinforced Hydrawand hose and its connectors have an operating pressure of over 100 PSI, so it is not necessary to turn off the T-Valve after every use. Frequently inspect all your plumbing connections for dampness, to avoid any water damage from all exposed connections.
The 3M COMMAND HOOK will not damage your wall, so you can experiment hanging the Hydrawand in different locations. It will hold a substantial amount of weight if you select a fairly smooth surface, and clean it with alcohol before applying the tape. A large variety of colors and styles of 3M hooks are at most hardware stores, to suit your individual taste.
Note: You will find that after using the Hydrawand, very little tissue is used because you only need to pat dry. Spoil yourself with the most expensive toilet tissue! Another luxurious option is small, soft towels to pat dry
Email: sales@hydrawand.com